
ATA Dashboard Setup
Dashboard setup will allow you to see the employee information that you need to act on as soon as you login to ATA.
To set up your Dashboard select the ‘Dashboard’ tab and click ‘My Dashboard Setup’ from the dropdown menu

Checkmark each widget title you want to see on your dashboard and click on ‘Save’.

Click on the Integrity Data HRP logo and it will take you to your ATA Dashboard.


Look for missing punches, reports, and approvals.
This window shows missing punches:

To make corrections, click the ‘Edits’ tab and select ‘Time Management’ from the dropdown menu.

Correcting Punch Exceptions
From the Time Management menu, you will see punch exceptions that need to be corrected. These are missing punches older than 16 hours. Any punches that are 16 hours or newer will be considered punches within the Punch Threshold.
I = In punch
O = Out punch
LI = Lunch In
LO = Lunch Out

You should have a corresponding IN/Out Punch. If one is missing, it will cause an exception and needs to be edited to correct it. The example below has yellow highlights show the missing information. To make the correction, click on one of the missing information fields to open it.

When the punch opens, it will look like the example below. You will be able to make all the corrections needed for this employee’s punch from here, except for lunch punches.

This example shows an employee who had an Out Punch that should have been an In Punch, an Out Date needed to be added, and an Out Time needed to be added. Click on the ‘Time’ box to open a predefined grid where you can select the correct time, or you can add the time manually by typing it in the field. You can also add a note recording why you are making the change.

When you click on ‘Save’, the timecard exception will disappear.

Missed Lunch Punches
If the missed punch is a lunch punch, it needs to be corrected from a different area. Lunch punches create two punches. To make the correction, you need to click on the employee’s name to open their timesheet.
You can see the Lunch In, (LI) and the Start work after lunch at 11:30am and you can see that the employee clocked out at the end of the day. Because he didn’t clock out for lunch, the lunch out wasn’t created, and the morning work hours were not stopped. Adding the lunch out will calculate the hours worked prior to lunch and the among of time the employee took for lunch.

Add a Punch
To add the punch, click on ‘+Add New Punch’ on the Employee’s Timesheet. When the Add New Punch window opens, select the Punch Type from the dropdown menu. Fill in the Date and add the Time. Note the reason for the change and click on the ‘Save’ button.

The ‘Status’ will have changed to ‘Pending’.

Click on Refresh to see the effects of the change you made.


Go back to the Exceptions tab and click, you will still see the missing punch until you click on ‘Refresh’.

After clicking on the ‘Refresh’ button, the exception will disappear. You can continue with any other corrections you need to make
*Any missing punches that are not corrected will continue to be seen until they are corrected, regardless of the pay period. Change the Pay Period from the dropdown menu to get to the punch that needs to be corrected to clear it.
If an employee doesn’t clock in or out for an entire shift/day, you can add all the punches at the same time by going to the Employee’s Timesheet and clicking on ‘+Add New Transaction’.
Select the applicable Transaction Type and Pay Type from the dropdown menus. The pay types will vary with the transaction type that is selected.


Add the Start Date/Time, the End Date/Time, Lunch time, (if applicable), Notes, and click ‘Save’.

Approving Timesheets
Take note of the various colors on the timesheet. The colors will help you identify the pay type. The legend is at the top of the timesheet for your reference.

To review approvals from the timesheet, select the ‘Timesheet’ tab in the ‘Time Management’ window. Be sure to click on the ‘Show Approvals’ box at the top of the timesheet.

To change to the previous pay period by changing the pay period date from the ‘Pay Period’ dropdown menu in the ‘Timesheet’ tab on the ‘Time Management’ menu.
You should NOT approve/sign off on a current pay period because if an employee has not finished their clocking, that time will not go to their timecard.

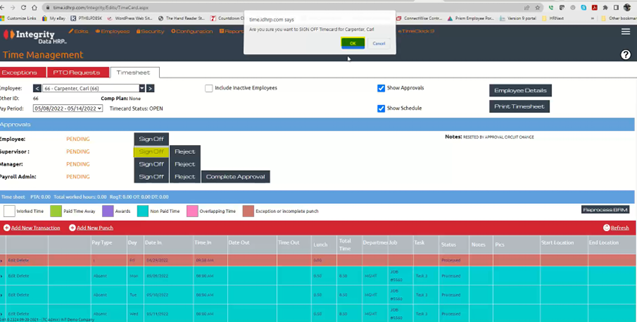
After selecting the correct pay period and reviewing for accuracy, click ‘Sign Off’. A pop-up widow will open and ask if you “Are sure you want to SIGN OFF Timecard for the employee”. Click the ‘OK’ button.
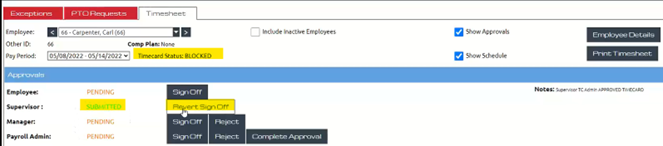
After clicking ‘OK’, you will see that it now says Submitted. The example shown is the screen an ATA Admin will see. It also shows ‘Revert Sign Off’.
If an Employee, Supervisor, Manager, or Payroll Admin signs off and the timecard needs to be reopened, an ATA admin is the only one with the credentials to reopen it. When anyone signs off, the timecard is blocked. Changes can’t be made to it without the ATA Admin reverting the Sign Off.
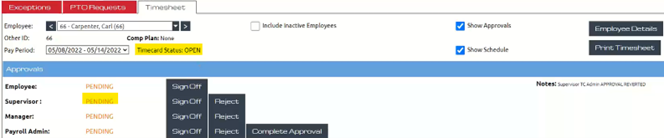
After the ATA Admin clicks on ‘Revert Sign Off’, the timecard status will be changed to OPEN, and all approvals will show as pending again and any changes/correction that need to be completed can be made. Click on ‘Sign Off’ again to submit the timecard.
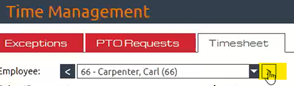
You can go employee by employee to complete your edits and sign offs by clicking on the greater than sign/right arrow next to the employee’s name.
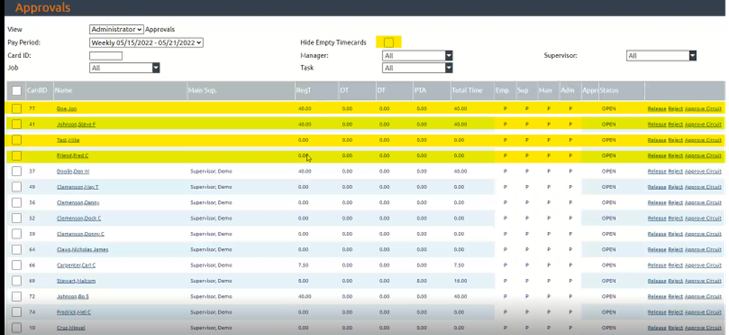
OR you can click the Edits tab and select Approvals from the dropdown menu.
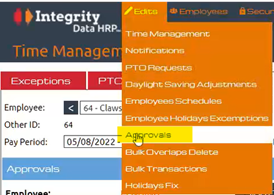
Now you will see all your employees except those that do not have a schedule and have not clocked in.
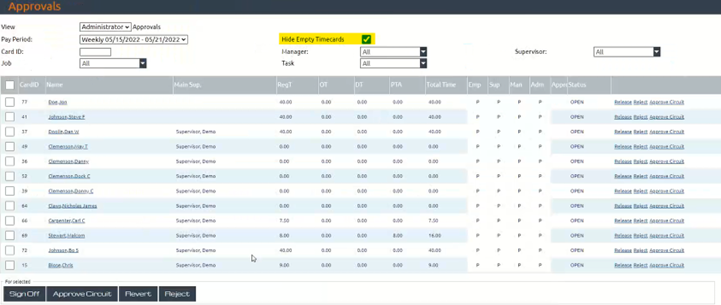
In this example you can see how, when reviewing May Clemenson’s timecard, you might think that it is empty because there is no time in it.

But if you click on her name, you see an absent punch, (opens in another window) which means there is something in it other than paid hours.
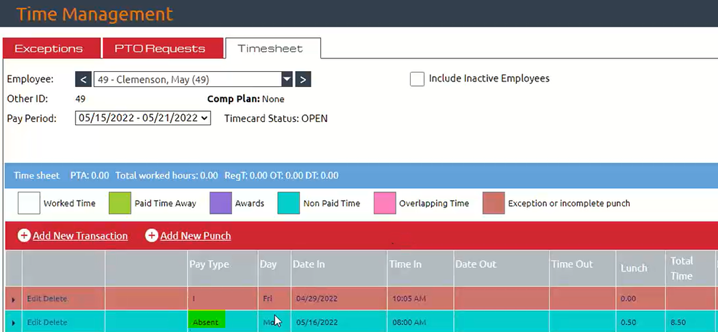
Employees whose names appear after the check is removed from Hide Empty Timecards are the ones who don’t have any hours in their timecard, they don’t have a schedule set, and they don’t have any absences.
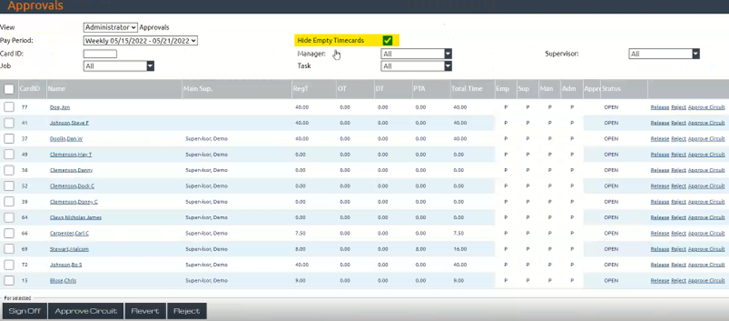
Verify that the times are what you are expecting and match what the employee should have worked, review overtime. If there are any errors, that is an indicator that something is wrong with the timecard. Again, you can click on the employee’s name, and it will open in another window, make any corrections needed.
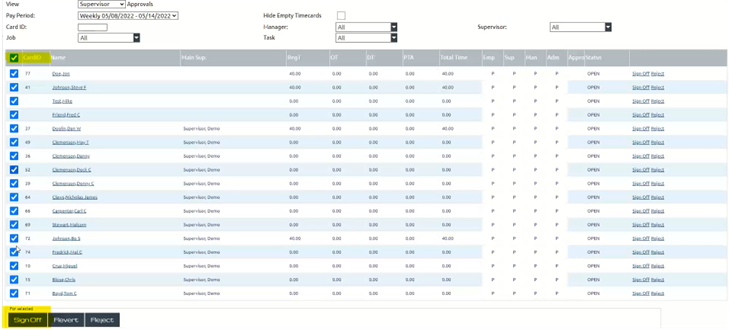
When you have completed your review and made needed corrections, you are ready to approve timecards. You can approve all the timecards at once by placing a check next to ‘CardID’. This will add a check to all of the employee timecards. To approve click the ‘Sign Off’ button.
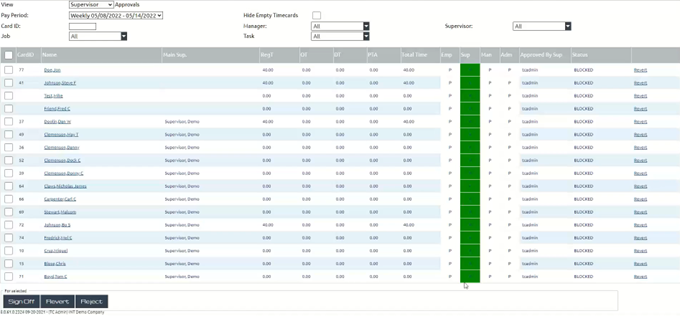
After you click ‘Sign Off’, a green ‘A’ will be added under Supervisor/Manager/Administrator (depending on who is approving) to show that they have been approved.
Questions / Resources
If you have questions or comments please email support@integrity-data.com.
Last Review: 11/08/2022
Leave A Comment