
The HRP Setup page empowers administrators to fine-tune settings related to employee self-service, synchronization, and data export. Whether you’re configuring benefit frequencies, managing PDF document security, or establishing API credentials, this page serves as a control center for HR and payroll processes.
Access HRP Setup
In GP, navigate to Tools > Setup > HRP Setup.
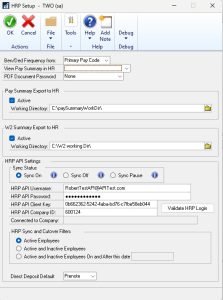
Now, let’s explore the details of each field on the HRP Setup page:
Ben/Ded Frequency From:
Choose the source for benefit/deduction frequency:
- Ben/Ded Setups: Use the settings from benefit/deduction setups.
- Primary Pay Code: Use the primary pay code frequency.
View Pay Summary in HR:
Select when the pay summary should be visible in HR:
- Once Posted: Display after payroll posting.
- On Payment Date: Show on the actual payment date.
PDF Document Password:
Set the password protection for PDF documents:
- None: No password required.
- Last 4 of SS Number: Use the last 4 digits of the Social Security Number.
- First 5 of SS Number: Use the first 5 digits of the Social Security Number.
- Full SS Number: Use the entire Social Security Number.
Pay Summary Export to HR:
Configure pay summary export settings:
- Active: Enable pay summary export.
- Working Directory: Specify the directory for exported files.
W2 Summary Export to HR:
Configure W2 summary export settings:
- Active: Enable W2 summary export.
- Working Directory: Specify the directory for exported W2 files.
Sync Status:
Manage synchronization status:
- Sync On: Enable synchronization.
- Sync Off: Disable synchronization.
- Sync Pause: Temporarily pause synchronization.
HRP API Credentials:
Enter the following API credentials:
- HRP API Username
- HRP API Password
- HRP API Client Key
- HRP API Company ID
Once that information is entered ‘Validate HRP login’ to try to connect the HRP to HR systems.
- Connected to Company: Indicates whether the system is connected to the company.
HRP Sync and Cutover Filters:
Define filters for employee data during synchronization and cutover:
- Active Employees: Include only active employees.
- Active and Inactive Employees: Include both active and inactive employees.
- Active and Inactive Employees On and After This Date: Specify a date for filtering.
Direct Deposit Default:
Set the default direct deposit option.
- Active
- Assigns all new accounts to an active status.
- Prenote
- Assigns all new accounts to a prenote status and count.
Questions / Resources
If you have questions or comments please email support@integrity-data.com.
Last Review: 04/24/2024
Leave A Comment