
Payroll NOW
Knowledge Base
To better your search experience, we have updated our Knowledge Base with additional categories.
Please take a moment to familiarize yourself with the new landscape located on the right.
The traditional global search is still available at the top of our website, but we hope that this new format will simplify your searches.
As always, if you have any questions, shoot us an email.
KB15-021
Once you have completed two live payrolls within Payroll NOW, your account will be transitioned out of Implementation and into our Post Implementation Support group.
If you have a question, issue, or concern; in order to get the quickest response, you must send an email request to: Support@Integrity-Data.com
If this is an urgent matter, (i.e. you are in the middle of processing payroll), please indicate “URGENT” in the subject line, and within the body of the email, please mention that you are processing payroll.
In your email message, please provide as much detail as possible. This is extremely important so that once the ticket is assigned, the Support Specialist will be able to review and contact you with a possible solution without a lot of back-and-forth.
Things to include in your email:
- Indicate if this situation is preventing you from processing your payroll on time.
- Who is having this issue?
- What were they doing when this issue happened?
- What have they tried to get this to work?
- Where were they in the system when this issue happened?
- When did this issue happen?
- Include screen shots and any other important information that will assist the Support Specialist in resolving this issue.
Please allow 24 – 48 hours to receive a resolution to your general support issue. If your issue is urgent, you will receive a response sooner.
Questions / Resources
If you have questions or comments, please email support@integrity-data.com
If you would like to search for information and resources for Integrity Data products, check out the following sites:
- Knowledge Base: https://www.integrity-data.com/knowledge-base/
- Videos: https://www.integrity-data.com/video-library
Last Review: 9/10/2021 – Revision: 0.0
Applies To: Payroll NOW
Keywords: Contacting
Categories: Payroll NOW
KB15-021
From the Employee Record, select the “  ” icon for additional information.
On the Employee Statistics, select the Pstd. Payroll Docs.

This will open a list of Payments made to an employee. You will select the document you need or click on the document to open. Either way, you will see the option to “Reverse Document”.

Select “Reverse Document”. This will open a box with all of the document details that you are about to void.
Select “Reverse” or “Reverse and Print”.
You will then need to confirm that you want to reverse these entries.
Once completed, you will receive notification that the entries were successfully reversed, and that document will no longer show on the Posted Payroll Processing list for the employee.
Questions / Resources
If you have questions or comments, please email support@integrity-data.com
If you would like to search for information and resources for Integrity Data products, check out the following sites:
- Knowledge Base: https://www.integrity-data.com/knowledge-base/
- Videos: https://www.integrity-data.com/video-library
Last Review: 8/31/2021 – Revision: 0.0
Applies To: Payroll NOW
Keywords: Voiding
Categories: Payroll NOW
KB15-020
Search for W2 Distribution Management by selecting the search at the top right of the screen and type in W2 Distribution Management. Once it appears click on the module.

If you do not see this module when you search, contact support at support@integrity-data.com to get it installed.
When the module opens, you will need to Load the W2 employees for the year. Click on Process at the top of the ribbon and select Load W2 Employees.
This provides a list of all employees with earnings in the current year. If there are blocked or terminated employees with earnings for the year, they will show in this list.
Once this list is loaded you can begin processing W2’s.

Select Reports at the top of the ribbon and then select W2 Report

A window of options will open. You will need to select the format you will be printing. There are two formats available:
- 1 Form per page Layout
With this format, no additional form purchase is needed. All forms can be printed for all employees or just one depending on the filter you pick.
The Pages to print are as follows:
Copy 1 – For State, City, or Local Tax Department
Copy B – To Be Filed with Employee’s Federal Tax Return
Copy C – For Employee’s Records
Copy 2 – To Be Filed with Employee’s State, City, or Local Income Tax Return.
Copy D – For Employer - 4up Form
Requires the purchase of 4up preprinted front and back form
If you print the 4up form and there are multiple states, it will print multiple forms for the same employee with only the 1st form showing the federal information
When printing the 4 up form, you may need to adjust the print down. You can do this by selecting either 1/32 inch or 1/16 inch in the options Tab. Adjust Numbers Down.
With the 4up form, you have the option to Collapse Multiple Local taxes. When this option is selected, MULTIPLE will be displayed. This enables more than one local tax to fit on one form. If unchecked, it will print an additional form for each locality with taxes. On the second form, the Federal numbers will not be printed.
If you choose to use the W2 Distribution Manager, you will want to put a check in the box “Set Printed to True”. This allows those employees to show as ‘Printed’ in the W2 distribution list.
Once you are ready, be sure to print all forms to a PDF first. Then, print from the PDF on blank paper or the preprinted forms depending on the layout you have selected.
Questions / Resources
If you have questions or comments, please email support@integrity-data.com
If you would like to search for information and resources for Integrity Data products, check out the following sites:
- Knowledge Base: https://www.integrity-data.com/knowledge-base/
- Videos: https://www.integrity-data.com/video-library
Last Review: 8/19/2021 – Revision: 0.0
Applies To: Tax Services
Keywords: Paper Print, W2
Categories: Tax Services
KB15-018
W2 Mapping
All deduction, earning and employer contribution payroll codes need to be verified before running W2.
When payroll codes are setup, it is important to identify the W2 classification of that code. You will want to make sure that the W2 Classification box is marked with the appropriate Box and Code. You will want to be sure all items that are required to be reported are mapped to the appropriate boxes. Taxable wages and taxes withheld for federal withholdings, Social Security, Medicare, State Withholding Tax and Local Withholding Tax will already be mapped. Any additional taxes withheld, such as State Disability Tax or Paid Leave will not be mapped automatically. Also, it is best practice to only map codes that are required. Deductions such as Vision Insurance or Flexible Medical Spending are not required and often take up too much space on the W2, which causes it to carry over to multiple pages.
Earnings
Be sure to watch for earning codes that are required to be reported in Box 12 and Box 14.
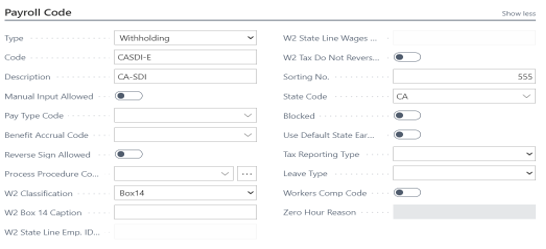
The new requirement for reporting Qualified Sick Leave or Qualified Family Leave Wages that have been reported on the 941 under FFCRA will need to be mapped to Box 14 and designated which type of leave they are associated with. Below is an example of how to map your COVID Pay.
 Other earnings will need to mapped the same way if they are required to be reported in Box 12 or Box 14.
Deduction Codes
For deductions that are required to be reported are mapped in a similar way. Here is an example of retirement plans and health insurance.

A 401k Traditional plan has a W2 classification of box 12D while a 401k ROTH plan has a W2 classification of box 12AA.
There are different box classifications for different payroll codes.
In the BENEFIT SETUP section there is a check box for W2 RETIREMENT PLAN. This needs to be checked for plans that are classified by the IRS as “Retirement Plan” for box 13 of the W2.
Payroll codes that are for employer contributions should be marked as RETIREMENT EMPLOYER CONTRIBUTION.

Any pretax health insurance deductions that are marked for box 12DD, need to have the HEALTH INSURANCE DEDUCTION box marked in the BENEFIT SETUP section of the payroll code.
Any employer contributions related to the pretax health deductions that are marked for box 12DD need to have the HEALTH INSURANCE CONTRIBUTION box marked in the BENEFIT SETUP.
Other Taxes
For all taxes withheld from employees pay that are not already mapped, you will want to be sure they are in Box 14.
Questions / Resources
If you have questions or comments, please email support@integrity-data.com
If you would like to search for information and resources for Integrity Data products, check out the following sites:
- Knowledge Base: https://www.integrity-data.com/knowledge-base/
- Videos: https://www.integrity-data.com/video-library
Last Review: 8/5/2021 – Revision: 0.0
Applies To: Payroll NOW
Keywords: W2; Mapping
Categories: Tax Services
KB15-012
Reversing Multiple Checks
- Go to the Full Payroll Menu -> History -> Payroll Ledger Entries

-
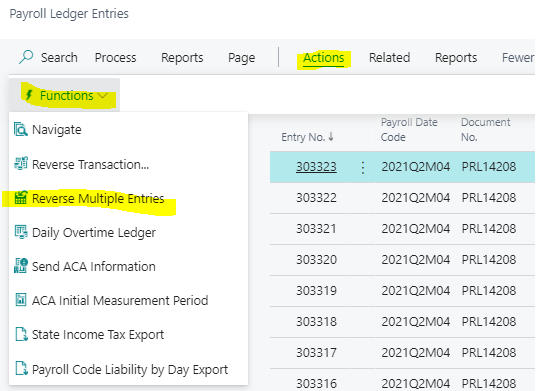
- Click Actions -> Functions -> Reverse Multiple Entries
-
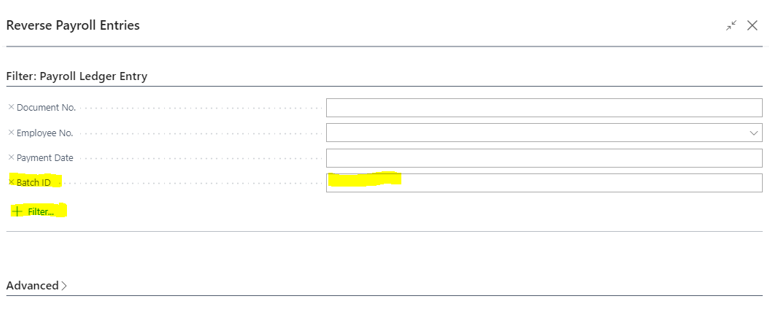
- Reverse Payroll Entries Window will open
- Default Filters are:
- Document No.
- Employee No.
- Payment Date
- Default Filters are:
- Reverse Payroll Entries Window will open
-
-
- Add a Filter for something specific to the documents to reverse. Example is Batch ID
- Add the filter using the + Filter option -> Chose Batch ID -> then enter the Batch ID to Reverse
- Then press OK
- Add a Filter for something specific to the documents to reverse. Example is Batch ID
-
Questions / Resources
If you have questions or comments please email Support@integrity-data.com.
If you would like to search for information and resources for Integrity Data products check out the following sites:
- Knowledge Base: https://www.integrity-data.com/knowledge-base/
- Videos: https://www.integrity-data.com/video-library
Last Review: 6/10/2021 – Revision: 0.0
Applies To: Payroll NOW
Keywords: Reversing, Checks
Categories: Payroll NOW
KB15-011
Updating SUI Rates
Use the Full Payroll Menu
- Select Periodic Processing..

- Select Employer Tax Rate / Limit Update

- The next window is the Employer Tax Update – Make sure to toggle on show more

-
- Action = Add – (adding a new record) / Modify – update existing record / Delete – delete record
- Type = State Unemployment
- Specify FUTA State = Leave toggled off
- State Abbreviation – Texas = TX, etc.
- Employer Tax Code = Use Drop down to select the SUTA Tax you are wanting to update.
- Year = 20xx
- Effective Date – Select start date
- Tax Percent = 1.25 for 1.25%
- Tax Limit = Wage limit for the specific state (example FL limit is $7,000.00
Once you have the information set, press OK. You will get a prompt about making an update – ‘OK” or ‘Yes’
- To Review your update go to Customer Payroll Tax Setup

-
- Select State Unemployment

-
- You will then see the SUTA Table

Find the state that you have updated and review that the change has been completed.
Questions / Resources
If you have questions or comments please email Support@integrity-data.com.
If you would like to search for information and resources for Integrity Data products check out the following sites:
- Knowledge Base: https://www.integrity-data.com/knowledge-base/
- Videos: https://www.integrity-data.com/video-library
Last Review: 6/10/2021 – Revision: 0.0
Applies To: Payroll NOW
Keywords: SUI
Categories: Payroll NOW
KB 15-010
Creating Pay Cycles:
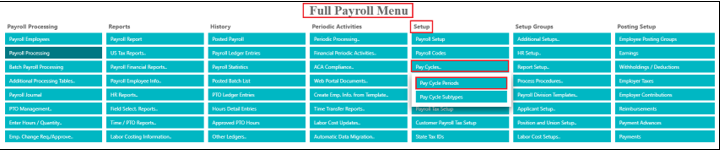
- Go to: Full Payroll Menu
- Under: Setup
- Click: Pay Cycles
- Click: Pay Cycle Periods
- Click: Create Pay Cycle Periods

- Period Type = choose pay frequency
- First Period of Year Based On: = choose “Payment Date”
- Starting Date = period begin date
- No. of Periods = number of weeks to create calendar (usually 2 years-worth)
— 104 for Weekly
— 52 for Bi-Weekly
— 48 for Semi-Monthly
— 24 for Monthly - Payment Date Formula from Pay Cycle End Date = number of days after period end date
— 6D (Ex. Period end date is Saturday; pay date is Friday)
— 5D (Ex. Period end date is Saturday; pay date is Thursday)
— -5D (Ex. Monthly payroll paying for entire month, but pay date is the 25th of the same month)
— Etc. - Posting Date Formula from Pay Cycle End Date = number of days after period end date
— 6D (Ex. period end date is Saturday; posting date is Friday)
— 5D (Ex. period end date is Saturday; posting date is Thursday)
— -5D (Ex. Monthly payroll paying for entire month, but posting date is the 25th of the same month)
— Etc. - Click: OK
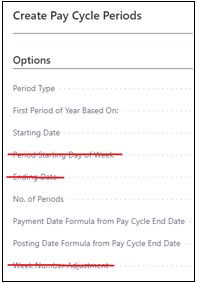
Update/Correct Dates in a Pay Cycle:
- From within the Pay Cycle Periods screen
— Click in the appropriate field
— Update the info
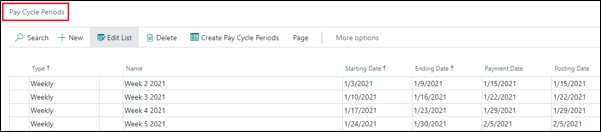
Questions / Resources
If you have questions or comments please email Support@integrity-data.com.
If you would like to search for information and resources for Integrity Data products check out the following sites:
- Knowledge Base: https://www.integrity-data.com/knowledge-base/
- Videos: https://www.integrity-data.com/video-library
Last Review: 6/1/2021 – Revision: 0.0
Applies To: Payroll Now
Keywords: Pay, Cycles
Categories: Payroll NOW
KB 15-009
General Setup:
- Go to Full Payroll Menu
- Under: Setup, Click On: Payroll Setup
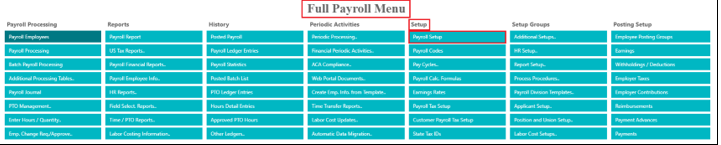
- In the section “General”:
- Click On, Allow Manual Holidays = ON

Update “_REGULAR” Payroll Calc Formula:
- Go To Full Payroll Menu
- Under: Setup, Click: Payroll Calc Formulas
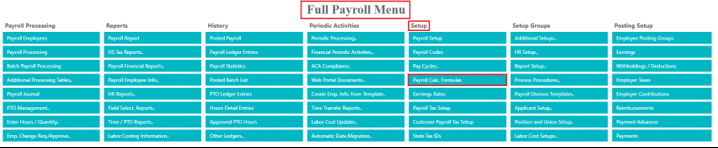
- Select: “_REGULAR”
- Click: Setup
- Click: Lines
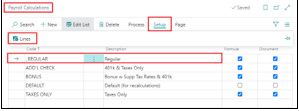
- Make sure you have a line for HOLIDAY as follows:

Create the Holiday Calendar:
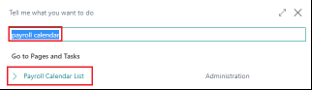
- In Business Central, click on the search icon in the top-right corner
- Search for “Payroll Calendar”
- Click on the link for “Payroll Calendar List”
- Click: Related
- Click: Base Calendar
- Click: Edit Calendar
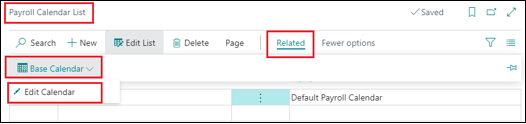
Add next year’s company-observed holidays
- Recurring System = Special Day
- Date =
- Day = (this will automatically populate based on the date that’s entered)
- Description = enter description of the holiday
- Nonworking = checked
- Nonworking Hours = 8

Questions / Resources
If you have questions or comments please email Support@integrity-data.com.
If you would like to search for information and resources for Integrity Data products check out the following sites:
- Knowledge Base: https://www.integrity-data.com/knowledge-base/
- Videos: https://www.integrity-data.com/video-library
Last Review: 6/1/2021 – Revision: 0.0
Applies To: Payroll Now
Keywords: Holiday, Calendar
Categories: Payroll NOW
KB 15-008
End-Date Current Benefits:
- Full Payroll Menu
- Under: Setup Groups
- Click: HR Setup
- Click: Benefit Rate Details
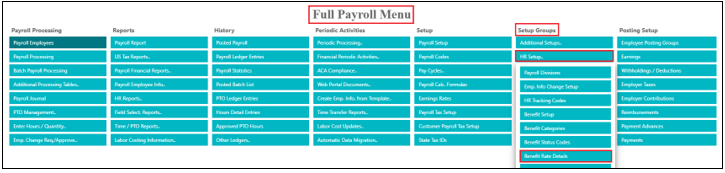
Enter appropriate Ending Dates for each appropriate Payroll Code/Benefit Status Code
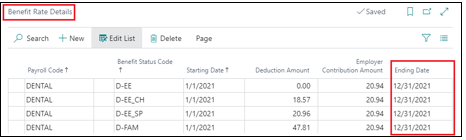
Enter New-Year Benefit Rates:
- Scroll to the bottom of the card and enter new lines for each…
◊ Payroll Code
◊ Benefit Status Code
◊ Starting Date
◊ Deduction Amount
◊ Employer Contribution Amount
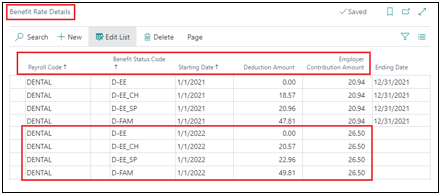
Questions / Resources
If you have questions or comments please email Support@integrity-data.com.
If you would like to search for information and resources for Integrity Data products check out the following sites:
- Knowledge Base: https://www.integrity-data.com/knowledge-base/
- Videos: https://www.integrity-data.com/video-library
Last Review: 5/28/2021 – Revision: 0.0
Applies To: Payroll NOW
Keywords: Benefit, Payroll
Categories: Payroll NOW
KB15-013
The Payroll Tax Payments window is where all periodic and quarterly data is sent to the Integrity Data system. Payroll documents that have been posted before Tax Payment product activation will not be seen in this window. Please ensure that the product is activated before posting payroll documents.
Periodic Payroll Processing
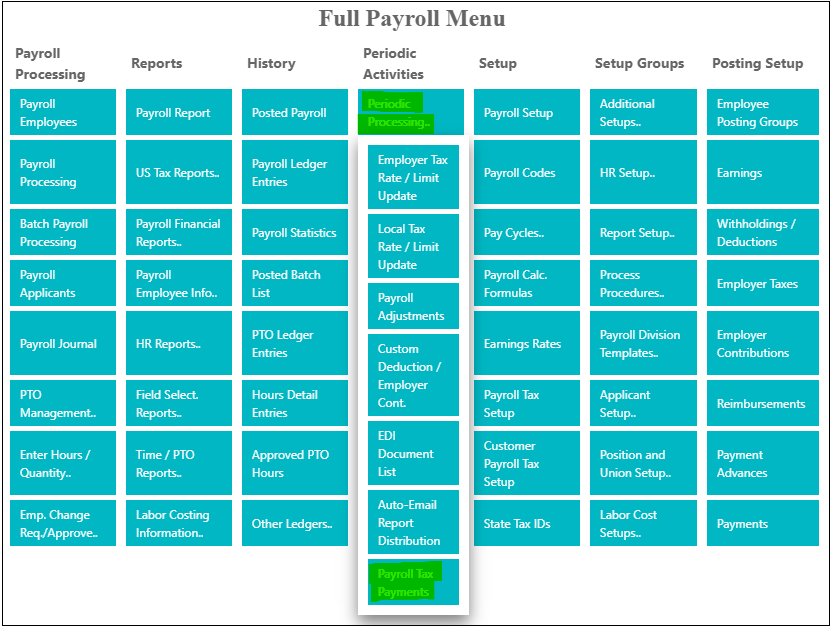
After posting each payroll or batch, go to the Full Payroll Menu, select Periodic Processing under the Periodic Activities column. Select Payroll Tax Payments at the bottom of the dropdown menu.
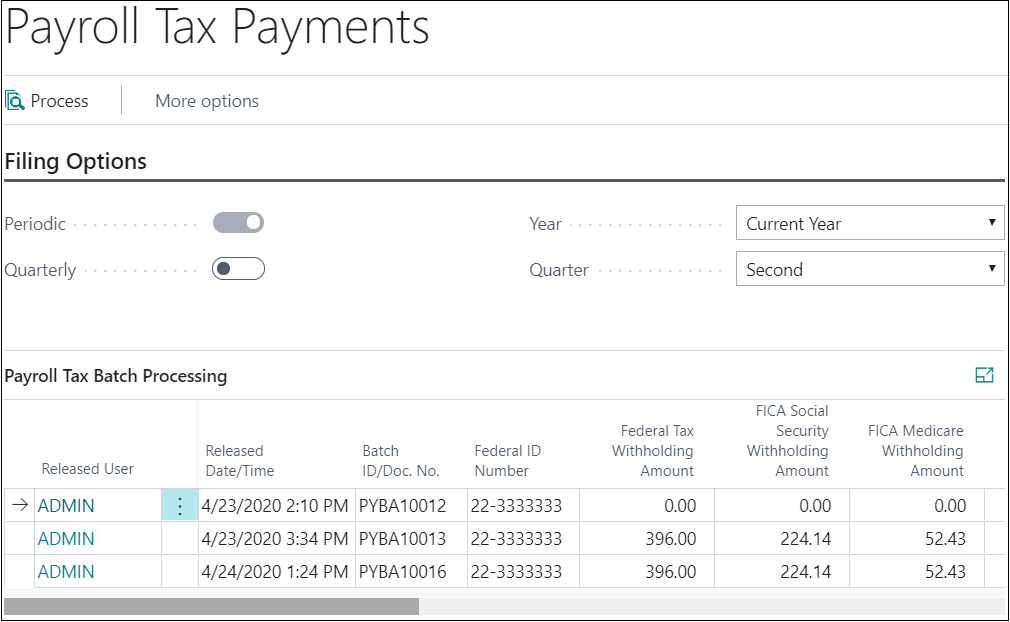
You will select the batch by clicking on it. You will then process by clicking on the process button. This button is used to submit the periodic or quarterly records to the Integrity Data System. Your data has now been submitted.
Questions / Resources
If you have questions or comments, please email support@integrity-data.com
If you would like to search for information and resources for Integrity Data products, check out the following sites:
- Knowledge Base: https://www.integrity-data.com/knowledge-base/
- Videos: https://www.integrity-data.com/video-library
Last Review: 5/6/2021 – Revision: 0.0
Applies To: Payroll NOW
Keywords: Payroll, Tax
Categories: Payroll NOW, Tax Services
KB15-008
To meet the tax payment deadlines for the processing of ACH files and to remit tax payments and collect funds, we adhere to a payroll file transmission cut-off time of 3:00 pm CST two days before the check date to help ensure files are sent to the bank in timely. Failure to meet the file transmission deadline may result in the assessment of fees for submitting a late payroll.
Tax amounts to be drafted from your account are based on the payroll file’s total taxes. The drafts are scheduled for one banking day before the check date and initiated via ACH one banking day before the tax due date. If you process two separate payrolls on the same day using the same check date, the draft will combine both amounts and draft the net amount.
Integrity Data cannot control what time of day your bank posts the debit to your account. To ensure the draft from Integrity Data is not returned, we highly recommend that you check your bank to confirm when debits are posted. As an extra precaution, Integrity Data also recommends that you make funds available by the close of business one banking day before the scheduled draft.
Due to the IRS and various state agency requirements associated with high liability payrolls, payrolls over $100,000.00 are subject to a WireIn requirement. We have two options for you:
- Integrity Data is pleased to offer DrawDown FedWire, otherwise known as a “reverse wire” processing for your protection. The industry giants use this funding method to limit risk exposure. Common reasons you may want to use DrawDown FedWire processing is for “next day” payrolls or if your payroll liabilities are regularly over $100,000.00. If you prefer that we do a Reverse Wire for the payroll liabilities over $100,000.00, please complete the Reverse Wire Setup steps and return the authorization letter from your bank to me.
- Please provide us with your banking information so we can draft your account for each payroll. You may request the WireIn form to wire funds to our account if the payroll tax liabilities are over $100,00.00.
Questions / Resources
If you have questions or comments, please email support@integrity-data.com.
If you would like to search for information and resources for Integrity Data products, check out the following sites:
- Knowledge Base: https://www.integrity-data.com/knowledge-base/
- Videos: https://www.integrity-data.com/video-library
Last Review: 5/7/2020 – Revision: 0.0
Applies To: Payroll NOW
Keywords: Tax Filing, Funding, Tax Services
Categories: Tax Services, Payroll NOW
KB15-007
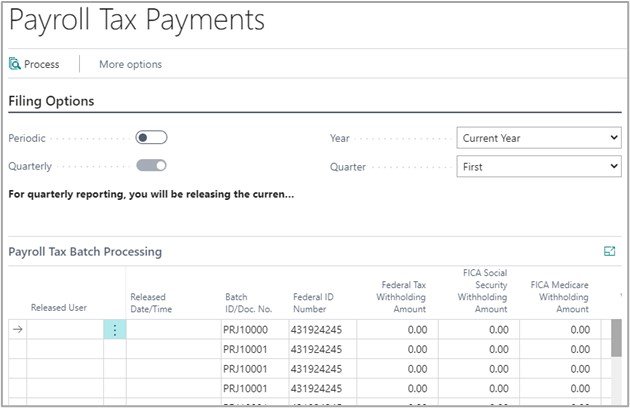 After posting your last payroll or batch of the quarter, you will select the Quarterly toggle by clicking on it. You will make sure that the Year and Quarter are correct. You will then process by clicking on the process button. This button is used to submit the periodic or quarterly records to the Integrity Data System. If you process any adjustments after you have done this process, you will need to submit the payroll and rerun this. Please contact your Tax Filing Specialist in this situation to be sure the reports are updated.
Quarterly Balancing Responsibilities
- Once the quarterly file has been processed, you will receive a report stating your total liabilities for the quarter. You will need to verify the information and reply with any changes before the deadline provided, or the returns will be processed with the totals that have been supplied to you.
- You may see variances in the data. This is most common if there are any differences in the unemployment tax rates. Our system will create a credit or debit based on this information and either pull extra funds needed or return funds pulled in excess.
Questions / Resources
If you have questions or comments, please email support@integrity-data.com
If you would like to search for information and resources for Integrity Data products, check out the following sites:
- Knowledge Base: https://www.integrity-data.com/knowledge-base/
- Videos: https://www.integrity-data.com/video-library
Last Review: 5/6/2021 – Revision: 0.0
Applies To: Payroll NOW
Keywords: Quarter, Tax
Categories: Payroll NOW, Tax Services
KB15-006
Accruals are built to compute on the first processing of a Pay Cycle. The Pay Cycle name is attached posted documents as you process pay and compute all additional activity inside of pay processing.
There is a hierarchy that needs to be observed.
- Creating Additional Pay AFTER you have created the current Pay Cycle
- You can simply re-run the same pay cycle name AFTER you have created the Payroll run and re-use the dates to populate Posting and Pay Dates.
- Creating Additional Pay PRIOR to creating regular Payroll Run for the upcoming Payroll
- If you create additional pay in advance of creating pay you need to chose the pay cycle period PRIOR to the upcoming payroll cycle.
- You can manually update the payment and posting dates to post and pay when you want.
NOTE: Pay Cycle Name is the driver of the computation of accruals. There is code to PREVENT additional accruals of PTO on multiple Pay Runs. Therefore the Pay Cycles need observed.
Questions / Resources
If you have questions or comments please email Support@integrity-data.com.
If you would like to search for information and resources for Integrity Data products check out the following sites:
- Knowledge Base: https://www.integrity-data.com/knowledge-base/
- Videos: https://www.integrity-data.com/video-library
Last Review: 5/04/2021 – Revision: 0.0
Applies To: Payroll Now
Keywords: Accruals
Categories: Payroll Now
KB15-005
Create the Payroll Code for the Withholding
- Full payroll menu
- Setup Column
- Payroll Codes
- + New
- Set the withholding up with all needed information
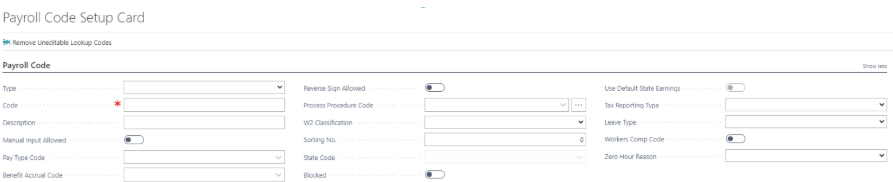
Set the Posting Setup for G/L Posting
- Full payroll menu
- Posting Setup
- Withholdings / Deductions

Set up the Local Tax Rate / and Wage Limit if needed
- Full payroll menu
- Periodic Activities column
- Periodic Processing…
- Local Tax Rate / Limit Update
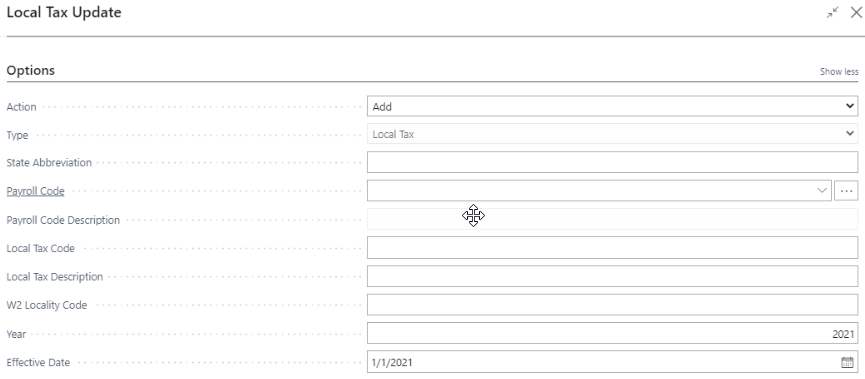
- Options group
- Action – Add / Modify / Delete
- Type – Local Tax
- State Abbreviation
- Payroll Code – Withholding code created for this taxation
- Local Tax Code – Additional code for Tax Reporting
- Local Tax Description – Description of tax code
- W2 Locality Code – Code to report on the W-2
- Year effective
- Effective date will populate based on Year selection
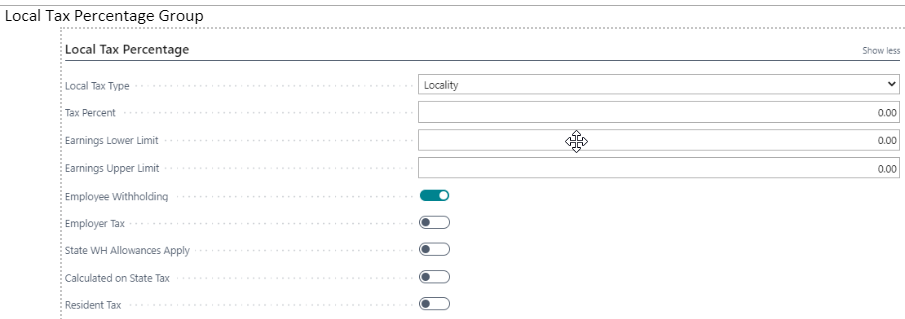
- Local Tax Percentage
- Local Tax Type – Locality or School District
- Tax Percent – percentage of tax (i.e. 1.5% is 1.50)
- Earnings Lower limit if needed
- Earnings upper limit if there is a cutoff of taxable earnings
- Employee Withholding – On for yes, Off for no
- Employer Tax – On for ER Tax, Off if not
- State WH Allowances Apply – On if yes
- Resident Tax – Defines if this is available on Resident box on state card. On for resident. Off for Work Locality.
- Options Group
- Options group
-
- Local Tax Percentage Group
Once created – you are able to set the local tax on the EE State WH Records
To complete – Have to add the withholding to the payroll calculation lines
- Full payroll menu
- Setup column
- Payroll Calc. Formulas
- Select + New
- Code to match calc code
- Type is Withholding
- Payroll Code – Code created for local tax calc
- Amount Type – Formula
- Formula – Local Tax – Work for Work locality tax or Local Tax – Resident for Resident withholding
- Formula ID and Calculation Sort should populate
- Make sure the State Filter defaults based on Pay Code setup
Now you are ready to calculate the check and see the withholding populated.
Questions / Resources
If you have questions or comments please email Support@integrity-data.com.
If you would like to search for information and resources for Integrity Data products check out the following sites:
- Knowledge Base: https://www.integrity-data.com/knowledge-base/
- Videos: https://www.integrity-data.com/video-library
Last Review: 5/04/2021 – Revision: 0.0
Applies To: Payroll Now
Keywords: Tax, Local
Categories: Payroll Now
KB15-004
Navigate to the Payroll Menu
- Go to Reports Column -> HR Reports.. -> Garnishment Reports
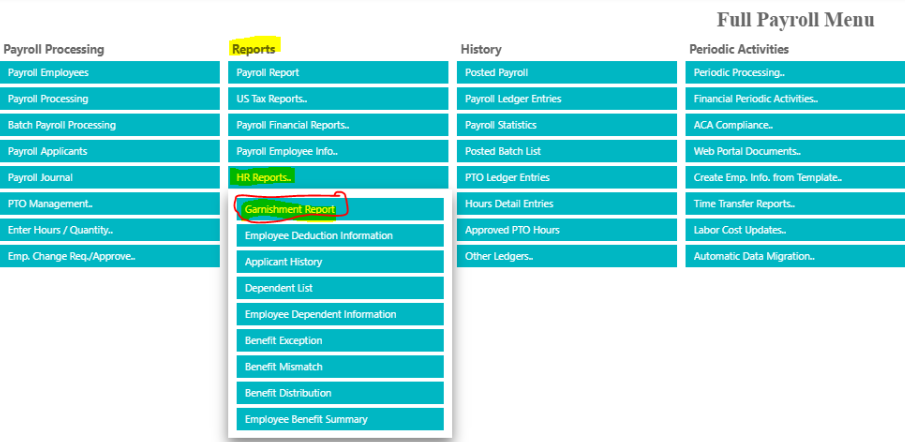
- From the Garnishment Case ID Window Select the Payment Date for the week of Reporting then Send to… (Choose your reporting style)
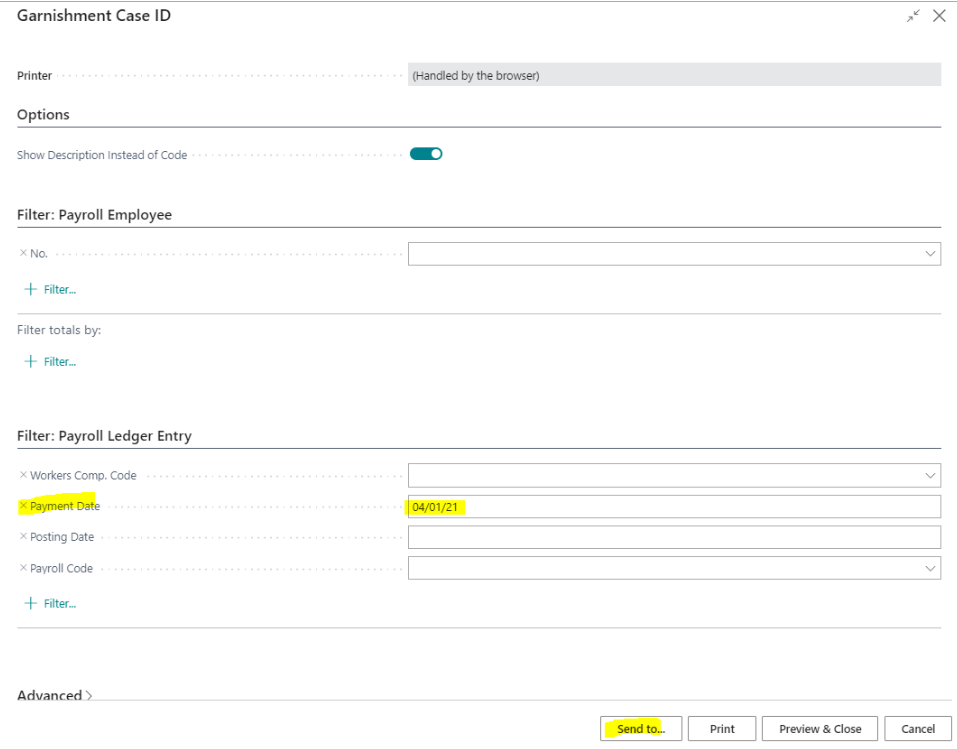
- Reporting will run. Then open the document
- Detail will appear on the reporting for the pay dates Garnishment activity
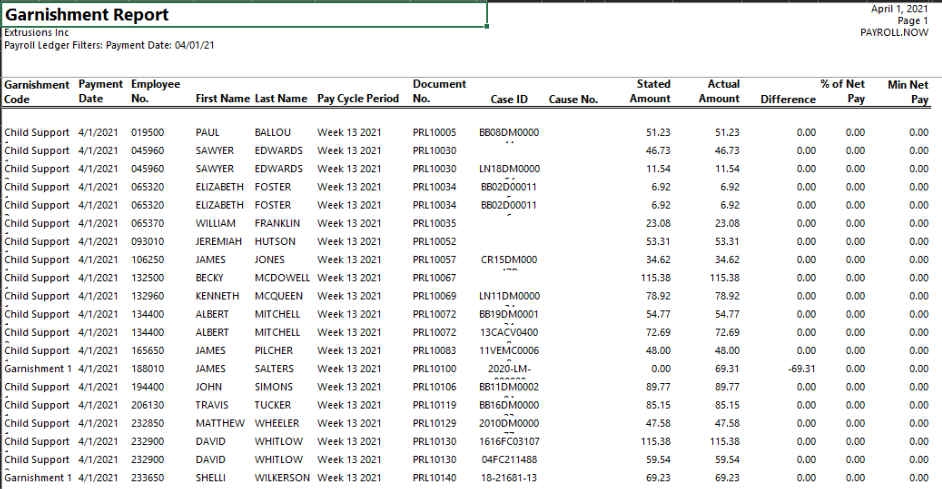
Questions / Resources
If you have questions or comments please email Support@integrity-data.com.
If you would like to search for information and resources for Integrity Data products check out the following sites:
- Knowledge Base: https://www.integrity-data.com/knowledge-base/
- Videos: https://www.integrity-data.com/video-library
Last Review: 5/04/2021 – Revision: 0.0
Applies To: Payroll Now
Keywords: Garnishment
Categories: Payroll Now
KB15-003
Full Payroll Menu

Additional Setups.. under the Setup Groups Column and choose Custom Deduct. Limits

Create a Code / Starting Date / Ending Date / Employee Deduction Limit / and the Employer Contribution Limit.

Then to attach to the Deduction, go to Payroll Codes

Scroll Down to the deduction code you wish to set a custom limit too and select. The example below is 401K Roth Owner. Go to the Deduction Setup area and choose the ellipsis next to the Custom Deduction Limit Code. Attach the code that you built above.

Questions / Resources
If you have questions or comments please email Support@integrity-data.com.
If you would like to search for information and resources for Integrity Data products check out the following sites:
- Knowledge Base: https://www.integrity-data.com/knowledge-base/
- Videos: https://www.integrity-data.com/video-library
Last Review: 5/04/2021 – Revision: 0.0
Applies To: Payroll Now
Keywords: Custom, Deductions
Categories: Payroll Now
KB15-002
Access the Full Payroll Menu

Choose Payroll Codes
- Found under the Setup Column second button down from the top.
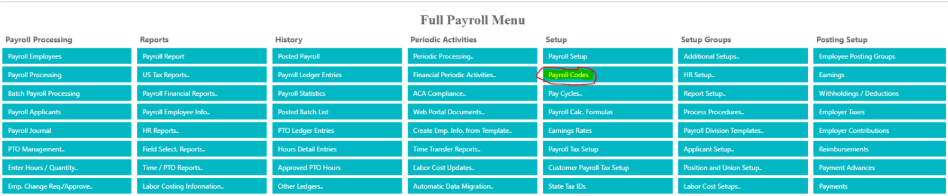
- Screen will show you current set up Payroll Codes starting with Earnings

- To Create a new pay code click the +New button in the ribbon bar.
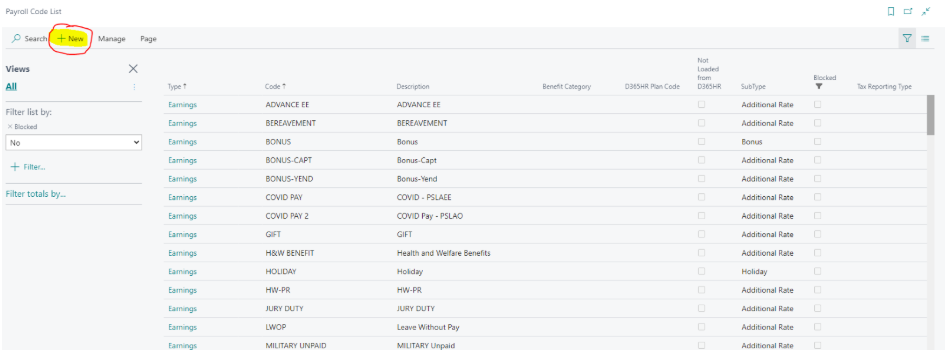
- The Payroll Code Setup Card will then appear.
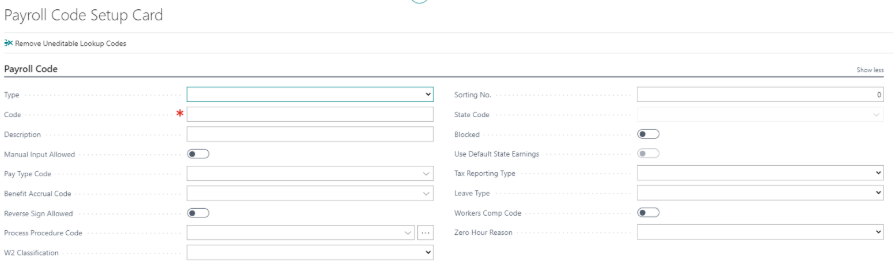
- Type – is a drop down menu with what you are creating. Options are:
- Earnings
- Deduction
- Withholding
- Employer Tax
- Direct Deposit
- Payment
- Employer Contribution
- Reimbursement / Draw
- Advance / Loan
- Code – is the Code label for the Payroll Code you are creating
- Open Field for creation
- Description – this is where you put the description of the code you are creating
- Manual Input Allowed
- When set to true you can manually override the amount calculated in the payroll line.
- Pay Type Code – customized field to link BC Resource Timecard to pay code
- Benefit Accrual Code – customized field to link BC Resource Timecard Benefit Codes
- Reverse Sign Allowed – Allows the payroll code to be manually reversed in the payroll document using the reverse sign
- Process Procedure Code – Field is used if you need to apply a process procedure to a payroll code
- W2 Classification – Drop down selection of W-2 codes to use on specific break outs of deductions to Box 12 with a code or Box 14.
- Sorting No. – Using this field you can set the order of the columns in the payroll report when the report is fun to group by payroll code.
- State Code – Populate with Withholding codes set to specific states
- Blocked – us this to Block a Payroll Code to no be used.
- Use Default State Earnings – When set to true, the earning for this tax will be calculates based on the default state in the payroll header. Only editable when mulit-state calculations are turned on and your payroll code is withholding or Employer tax.
- Tax Reporting Type – use with tax codes
- Federal
- State
- Local
- Leave Type – use with tax codes
- FLI
- SDI
- Workers Comp Code – Set to true if the Payroll Code is used for Workers Comp
- Zero Hour Reason – use is pay code will not have hours associated
- Bonus
- Royalty
- Severance
Once you have created the Payroll Code, you then need to create the posting setup. This is found on the Full Payroll Menu under Posting Setup
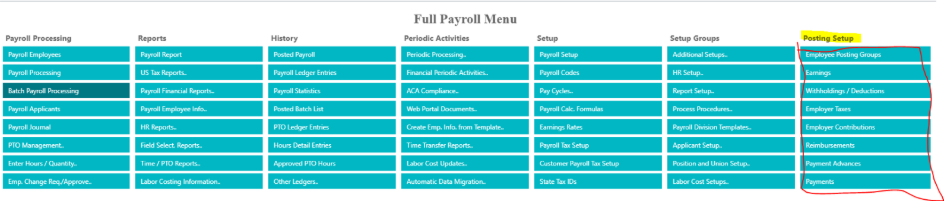
Depending on the Payroll Code you set up is where you will add the General Ledger Posting detail.
- Employee Posting Group – defines the Posting Groups and bank account for payments
- Earnings – this is where you define the debit account of your Earnings Pay codes
- Withholdings / Deductions – this is where you define the credit posting account of Withholding and Deductions
- Employer Taxes – this is where you define the debit and credit accounts for Employer Taxes
- Employer Contributions – this is where you define the debit and credit accounts for Employer Contributions
- Reimbursements – this is where you define the debit account for Reimbursement payments
- Payment Advances – this is where you define the debit account of Payment Advances
- Payments – this is where you where the payments are posting (typically this is set to the Posting Group Bank Account)
Now that you have created the code and added the GL posting setup, you then need to clarify if there needs to be a line calculations added to the Payroll Calc. Formula. To get there, Full Payroll menu -> Setup Column -> Payroll Calc. Formulas
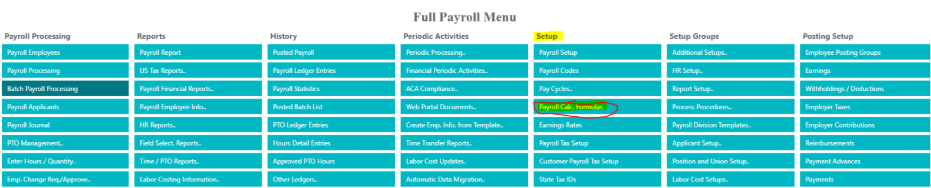
- Go into the Formula that you need to add the created code to calculate.
- For Earnings codes, the value will come in through the Calculation line for Earnings. No further action required
- For Deduction Codes, no further action required unless you need the code to act from a process procedure or other operation. If so, you need to enter a new row and enter the payroll code exclusively and set up the formula action appropriately.
- Withholding Codes – Add a new line and dictate the Type, Payroll Code, Amount Type of Formula and Formula as the Withholding Tax formula needed.
- Employer Tax – Add a new line and dictate the Type, Payroll Code, Amount Type of ‘Formula’ and Formal as the type of tax to calculate.
- Direct Deposit – Additional Direct Deposits will act on the Direct Deposit Deductions. No further action needed in the calculations table.
- Employer Contribution – Add a new line and dictate the Type, Payroll Code, Amount Type of ‘Formula’ and Formula column needs to be the formula needed to calculate.
Once all of the setups are completed, the payroll code will pull in with the calculation of the Payroll Checks based on the set up and dictation on how to operate.
Questions / Resources
If you have questions or comments please email Support@integrity-data.com.
If you would like to search for information and resources for Integrity Data products check out the following sites:
- Knowledge Base: https://www.integrity-data.com/knowledge-base/
- Videos: https://www.integrity-data.com/video-library
Last Review: 5/4/2021 – Revision: 0.0
Applies To: Payroll Now
Keywords: Pay Codes
Categories: Payroll Now
KB 15-001
-
Full Payroll Menu
-
Setup
-
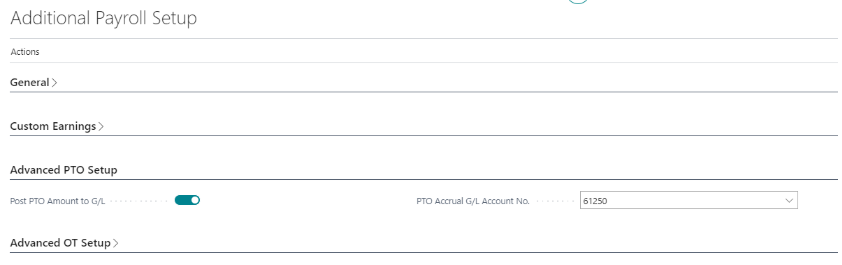
Payroll Setup

-
-
Additional Setup in the ribbon bar
-
Under the Advanced PTO Setup
-
Toggle on the Post PTO Amount to G/L
-
Enter GL department code for PTO Accrual G/L Account No
-
-
-
Setup
-
Payroll Codes
-
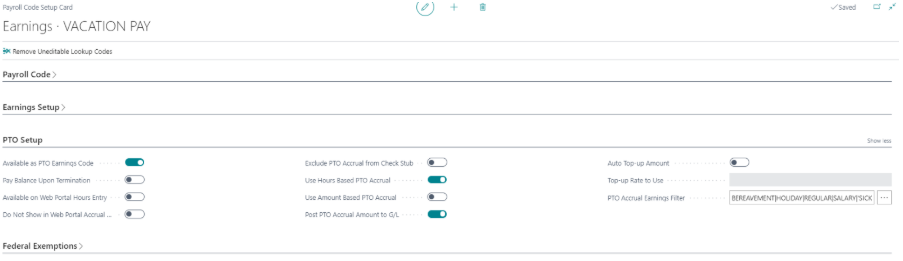
Go to the Vacation Pay code
-
Under the PTO Setup – this is where you set the parameters around the PTO Setup on the pay code.
-
-
-
Available as PTO Earnings Code – On
-
Use Hours Based PTO Accrual – On
-
Post PTO Accrual Amount to G/L – On
-
PTO Accrual Earnings Filter – Set the pay codes allowed to compute the accrual on
-
-
Earnings Posting Setup
-
This is where you set the Debit account to the Earnings code. Code is set to 23005
-

This Payroll Division controls the type and count of accruals. When you bring in time, accruals are created with the payroll check detail if they are hours dictated. If the accrual is set to an hours per year, the accrual is applied at the correct table of the division for hours allowed per pay period.
In this setup, the Debit of the earnings will post to the posting group earnings debit account. Accruals will post to 61250. Cash is offsetting the paid amount.
Questions / Resources
If you have questions or comments please email Support@integrity-data.com.
If you would like to search for information and resources for Integrity Data products check out the following sites:
- Knowledge Base: https://www.integrity-data.com/knowledge-base/
- Videos: https://www.integrity-data.com/video-library
Last Review: 5/4/2021 – Revision: 0.0
Applies To: Payroll Now
Keywords: Vacation, PN
Categories: Payroll Now